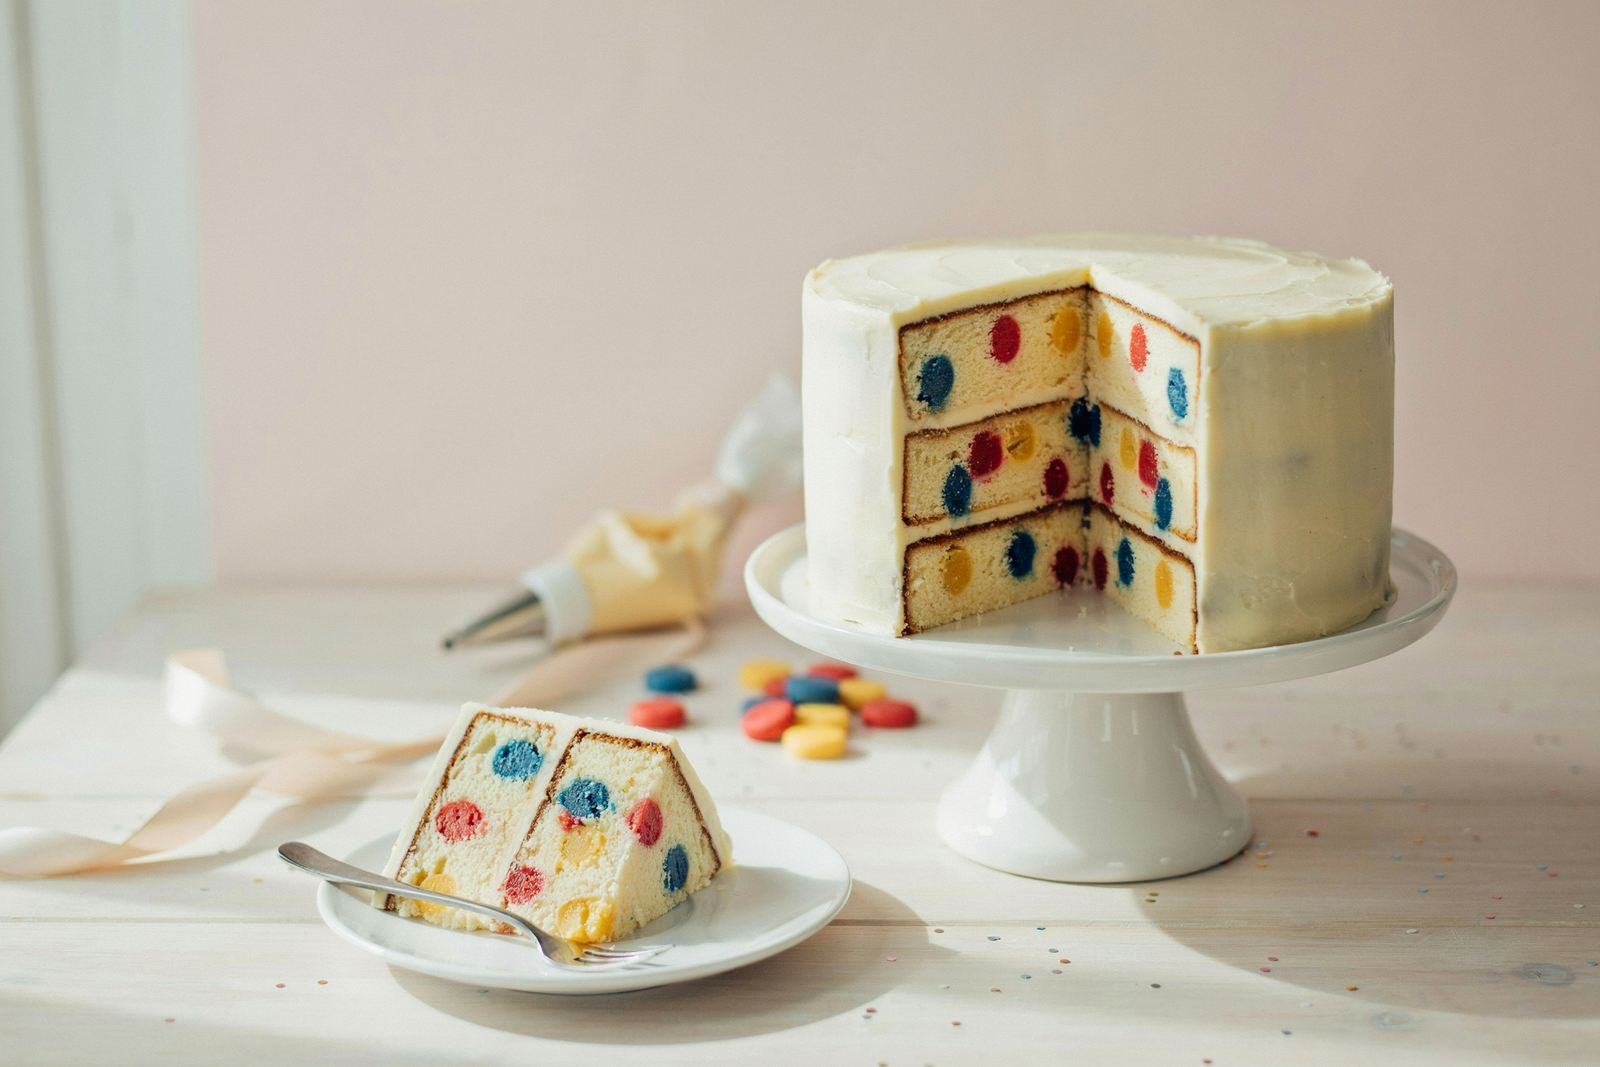
Dot Cake Recipe: How to Make a Polka Dot Cake (Easy Step-by-Step)
Bring playful elegance to any celebration with this dot cake recipe — a charming polka dot layer cake that combines a tender vanilla sponge with colorful dot insertions and a silky vanilla buttercream. Ideal for birthdays, baby showers, and special occasions, this cake looks impressive but is surprisingly achievable at home.
Quick Recipe Overview
- Preparation time: 40 minutes (includes dot batter prep)
- Cooking time: 25–30 minutes per layer
- Total time: 1 hour 30 minutes (including cooling and assembly)
- Servings: 10–12 slices
- Cuisine: American / Modern bakehouse
Ingredients
For the vanilla sponge
- 2 1/2 cups (312 g) all-purpose flour
- 2 1/2 tsp baking powder
- 1/2 tsp fine sea salt
- 1 cup (226 g) unsalted butter, room temperature
- 1 3/4 cups (350 g) granulated sugar
- 4 large eggs, room temperature
- 1 tbsp vanilla extract
- 1 cup (240 ml) whole milk or buttermilk
For the dot batter (colored spots)
- 1/2 batch of the vanilla batter (reserve 1/3 cup per color)
- Gel food coloring in desired colors (red, blue, yellow, etc.)
For the vanilla buttercream
- 1 1/2 cups (340 g) unsalted butter, room temperature
- 4–5 cups (480–600 g) confectioners’ sugar, sifted
- 2–3 tbsp heavy cream or milk
- 2 tsp vanilla extract
- Pinch of salt
Equipment
- Two 8-inch round cake pans (or 9-inch)
- Mixing bowls, hand or stand mixer
- Piping bags or squeeze bottles for dot batter
- Offset spatula and bench scraper
- Cooling racks
Step-by-Step Instructions
1. Prep and preheat
Preheat the oven to 350°F (175°C). Grease and line two 8-inch round cake pans with parchment paper. Sift flour, baking powder, and salt together and set aside.
2. Make the base batter
Cream the butter and sugar on medium-high until light and fluffy, about 3–4 minutes. Beat in eggs one at a time, scraping the bowl, then mix in the vanilla. With the mixer on low, alternate adding the dry ingredients and milk in three additions, beginning and ending with the dry ingredients. Mix until just combined—do not overmix.
3. Reserve batter for dots
Scoop out about 1 cup of batter and divide into small bowls (roughly 1/3 cup each). Tint each portion with gel food coloring until you reach vivid hues. Transfer each colored batter into separate piping bags or squeeze bottles. Keep the remaining uncolored batter covered.
4. Create the dot layers
Pipe small rounds of colored batter onto a parchment-lined baking tray to create the dot insert disks (about 1-inch circles). Bake these on a tray at 350°F for 6–8 minutes—just until set but not browned. Let cool completely. These will be embedded inside the cake layers to create the polka dot effect.
5. Assemble the cake batter in pans
Fill each cake pan halfway with the plain batter. Gently arrange baked colored dots on top of the batter in a pattern, leaving space between each dot. Carefully cover the dots with the remaining batter so they sit suspended within the cake after baking. Smooth the tops.
6. Bake
Bake 25–30 minutes, or until a toothpick inserted into the cake (avoiding dots) comes out clean. Cool in pans 10 minutes, then invert onto cooling racks and remove parchment. Let cool completely before trimming and layering.
7. Make the buttercream and assemble
Beat butter until creamy. Gradually add sifted confectioners’ sugar, then vanilla, cream, and salt. Beat on medium-high for 3–4 minutes until light and spreadable. Level cake layers, spread a thin crumb coat, chill 15 minutes, then finish with a final layer of buttercream. Smooth with an offset spatula for a clean finish.
Chef Tips
- Use gel colors for vibrant dots without thinning the batter.
- Make a test dot first to confirm baking time and size consistency.
- If dots shift while assembling, chill the layers briefly to firm them up.
- For extra height, bake three thinner layers instead of two.
Variations
- Chocolate dot cake: substitute 1/3 cup flour with 1/3 cup unsweetened cocoa powder in the base batter.
- Fruit-flavored dots: fold in 1–2 tbsp freeze-dried fruit powder into colored batters.
- Funfetti dots: stir small sprinkles into the dot batter for a confetti effect.
Storage and Reheating
Store the assembled cake in an airtight cake container in the refrigerator for up to 4 days. For longer storage, freeze individual slices wrapped tightly in plastic and foil for up to 2 months. Thaw overnight in the refrigerator before serving. To refresh chilled slices, bring to room temperature for 30–45 minutes; avoid microwaving whole slices as buttercream may split.
Nutritional Information (per serving, approximate)
- Calories: 420 kcal
- Total fat: 24 g (Saturated fat: 14 g)
- Carbohydrates: 52 g (Sugars: 35 g)
- Protein: 4 g
- Sodium: 220 mg
Frequently Asked Questions (FAQs)
1. Can I make the dot batter ahead of time?
Yes. Pipe the colored dots onto parchment and bake them a day ahead. Store cooled dots in an airtight container at room temperature and assemble when ready.
2. Will the dots stay perfectly round inside the cake?
If dots are baked uniformly and placed flat on batter, they will retain their shape. Use consistent dot size and avoid overfilling the pans to prevent shifting.
3. Can I use a different frosting?
Absolutely. Cream cheese frosting, Swiss meringue buttercream, or a whipped ganache all work, but choose frostings with enough stability to hold the cake layers and reveal the dots when sliced.
4. Is this dot cake recipe suitable for kids’ parties?
Yes. Its colorful appearance and simple vanilla flavor make it a favorite for children’s celebrations. Consider using natural color options if you prefer fewer artificial dyes.
Conclusion
This dot cake recipe elevates a classic vanilla sponge into a playful centerpiece. With a few simple steps—preparing colored dot inserts, suspending them in batter, and finishing with a smooth buttercream—you’ll create a show-stopping polka dot cake that tastes as good as it looks. Try this recipe for your next celebration, and share photos of your creation! If you found this recipe helpful, subscribe for more baking guides and leave a comment with your favorite color combos.